.png)

A Modern Content Production Workflow for Webflow Teams
A solid content production workflow is essentially your team’s repeatable playbook for getting from a rough idea to a published, analyzed piece of content. It’s the behind-the-scenes system that turns creative sparks into high-performing assets on your Webflow site, making sure every article is consistent, optimized, and actually helps your business.
Why Your Webflow Team Can't Afford a Chaotic Workflow
Are you constantly battling missed deadlines? Does the quality of your articles swing wildly from one to the next? Are you watching golden SEO opportunities slip through the cracks? These aren't just one-off headaches; they're classic signs of a broken or non-existent content process. For teams building on Webflow’s incredible CMS, not having a defined system turns a potential growth machine into a source of friction and wasted money.
Putting a well-designed content production workflow in place swaps that chaos for clarity. This isn't about bogging everyone down with corporate red tape. It's about creating a clear, predictable path so everyone knows what to do and when. It takes the guesswork out of the equation, lets people truly own their roles, and makes sure every article moves smoothly from a simple brief to a polished, published page.
Moving Beyond "Random Acts of Content"
Let’s be honest, without a workflow, content creation can feel like a mad dash. An idea comes up, someone quickly writes it, and it gets shoved into the Webflow CMS with little to no review. That approach is a recipe for disaster.
- Inconsistent Quality: The tone, formatting, and SEO execution are all over the place, which slowly chips away at your brand's authority.
- Wasted Time: You get stuck in endless back-and-forth edits, nobody is quite sure who's responsible for what, and there's a last-minute scramble for images and assets. So many hours down the drain.
- Poor Performance: Crucial steps get forgotten. Think technical SEO checks, internal linking, and a plan for promoting the piece. You end up with amazing content that nobody ever finds.
A documented workflow becomes your team's single source of truth. It locks in your best practices—from keyword research all the way to the final pre-publish check in the Webflow editor—baking quality and optimization into the process from the start, not as a panicked afterthought.
The Foundation for Scaling Up
As you decide to create more content, things get complicated fast. The global digital content creation market backs this up; it was valued at a massive USD 27.1 billion in 2023 and is expected to jump to USD 30.6 billion by 2024. All that investment is a flashing sign that you need efficient systems to handle the load.
To really get a handle on your process, it’s worth checking out some examples of workflow diagrams. Actually seeing the flow mapped out is one of the best ways to spot bottlenecks and clarify who hands off what to whom. A formal workflow is what lets you ramp up production without letting quality slide, turning your Webflow site into a true engine for leads and revenue.
Building Your Content Operations Foundation
A great content engine doesn't just happen. It’s built on a solid foundation of clear roles, the right tools, and a shared understanding of what you’re trying to accomplish. Before you write a single word, getting this operational bedrock in place is what prevents the confusion and bottlenecks that completely derail so many content programs.
This is where you figure out who does what, and how they do it.
For teams using Webflow, this means moving past a vague "content person" role and getting specific. Without that clarity, crucial tasks like technical SEO checks or final CMS formatting inevitably fall through the cracks. The whole point is to create a system where everyone knows their part, from the initial idea all the way to hitting "Publish."
Assembling Your Webflow Content Team
How you structure your team will obviously depend on your company’s size, but even a two-person operation benefits from assigning distinct responsibilities. The goal is simple: make sure every stage of the workflow has a clear owner.
To help you get started, we've outlined the most common roles we see in a well-oiled Webflow content machine.
Key Roles in Your Webflow Content Workflow
A breakdown of essential roles, their core duties, and the tools they'll use to collaborate seamlessly.
Even in smaller teams where one person wears multiple hats—like the strategist who also edits—the important thing isn't the number of people, but the explicit ownership of each function. When everyone knows what they're accountable for, things get done.
Choosing Your Tech Stack
With roles defined, you need the right tools to connect everyone. A scattered toolkit just creates friction and wastes time, but a well-integrated stack keeps the entire process running like clockwork.
Think of it as the connective tissue holding your team and process together.
Here’s a practical, no-fluff tech stack that works for most teams:
- Project Management: To track content from idea to published reality. Asana, Trello, or ClickUp are all solid choices.
- Collaborative Writing: For drafting, editing, and leaving feedback without a million email chains. Notion and Google Docs are the obvious front-runners.
- SEO & Research: To find keywords and see what the competition is up to. Ahrefs or Semrush are industry standards.
- Asset Management: A central place to store and find images, videos, and graphics. Google Drive or Dropbox are perfect for this.
The idea is to centralize communication and remove any guesswork. For example, when a writer finishes a draft in Notion, they just drag the corresponding card in Trello to the "Editing" column. That simple move can automatically notify the editor it's their turn. Little handoffs like this prevent delays and make it easy to see the status of every article at a glance.
For a deeper look at organizing this, check out our guide on creating an editorial calendar template.
Creating Your Single Source of Truth
This might be the most critical piece of your entire foundation: a single source of truth. This is one central document that aligns your entire team, outlining the mission and the rules of engagement.
It should clearly define:
- Business Goals: What is content supposed to achieve? (e.g., Increase organic leads by 20% this year).
- Target Audience Personas: Who are we really writing for? What keeps them up at night?
- Brand Voice & Tone: How do we want to sound? (e.g., Expert but approachable, witty but not silly).
- Style Guide: The nitty-gritty on formatting, grammar, and linking rules. For Webflow users, this should also include specifics like which global classes to use for blockquotes or styled lists to ensure brand consistency across all posts.
This document is your North Star. When a writer is unsure about tone, or a publisher needs to format a blockquote, they go back to this guide. It empowers your team to make consistent decisions on their own, which drastically cuts down on the need for micromanagement.
Getting this foundation right is more important than ever. Recent WFA research shows that outsourced content arrangements have jumped by 66%. A clear, centralized process backed by the right tech is the only way to manage any team effectively, whether they’re sitting in the next room or across the globe.
From Bright Idea to First Draft
Alright, with your foundation of roles and tools in place, it's time to get into the heart of the matter: your content production workflow. This is where raw ideas are hammered into polished drafts, ready for the final gauntlet of checks before publishing. A clunky creation process is a recipe for inconsistent quality and burned-out writers. But a well-oiled system? That’s how you ensure every single article is strategically sharp and on-brand from the jump.
This whole thing kicks off way before anyone types a single word. It starts with a smart, living backlog of ideas.
Build a Dynamic Content Backlog
The best content ideas don't just magically appear. They're uncovered by listening—really listening—to your market, your customers, and your own team. A static spreadsheet of random blog titles just isn't going to move the needle. You need a living, breathing repository of high-potential topics pulled from strategic sources.
So, where are these golden ideas hiding?
- SEO Research: Dig into tools like Ahrefs or Semrush for keyword research and topic cluster analysis. You're hunting for low-difficulty keywords with high business value—the sweet spot for quick wins and long-term authority plays.
- Customer Support Tickets: Your support team is sitting on a goldmine. What questions are they answering day in and day out? Every single one is a potential blog post that solves a real problem for your audience.
- Sales Conversations: Listen to your sales team's calls. What are the common objections or "aha!" moments that come up? Answering those questions in a detailed article arms your sales reps with killer assets and educates prospects at the same time.
This diagram shows how those foundational pieces—your roles, tools, and strategy—are the launchpad for a successful creation process.
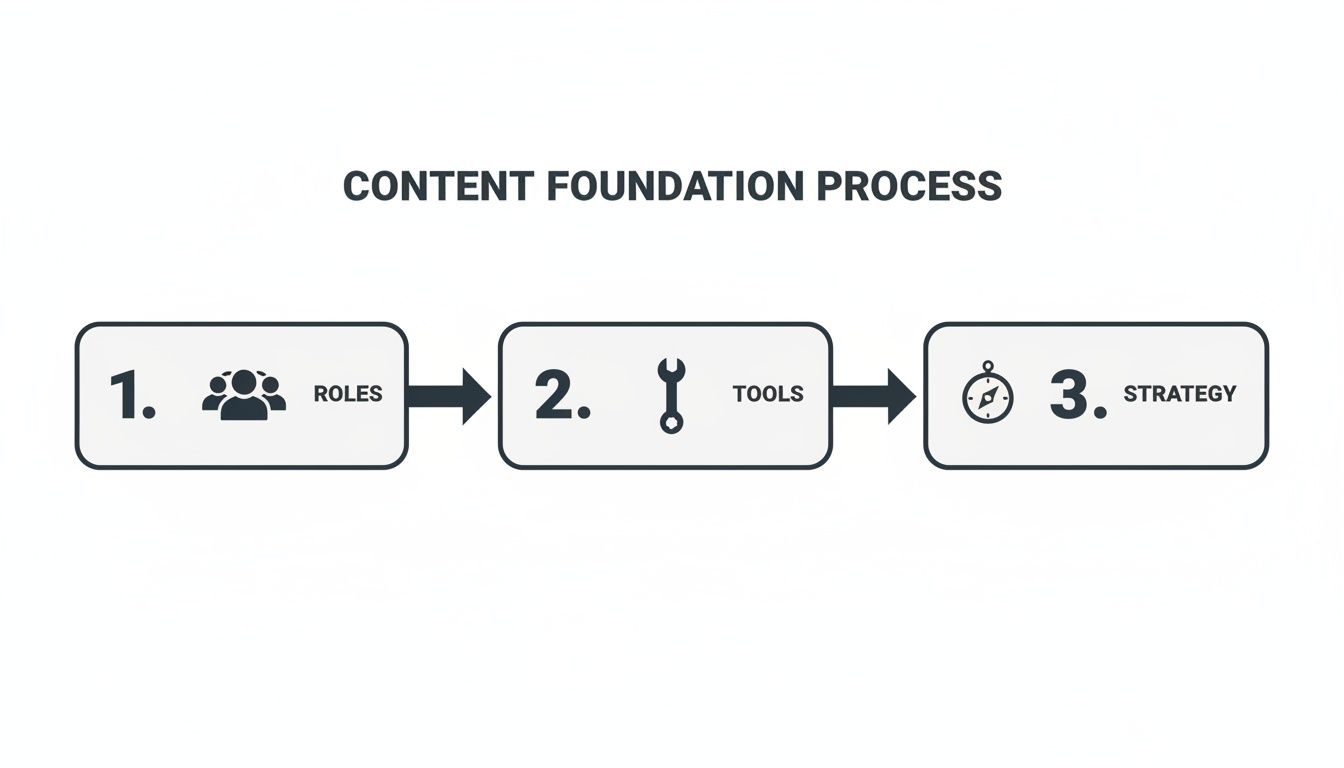
When you nail these core components first, you pave a clear road for every idea to travel down, making sure nothing gets lost or diluted along the way.
Craft the Perfect Content Brief
Once you've plucked a validated idea from your backlog, the next move is to build out a detailed content brief. This is, without a doubt, the single most important document in the entire workflow. A lazy, vague brief is an open invitation for confusion, misalignment, and soul-crushing rewrites.
A great content brief isn't a suggestion; it's the blueprint for success. It gives the writer everything they need to nail a high-performing article that hits every strategic mark, hopefully in the very first draft.
Think of the brief as the single source of truth for the article. No guesswork allowed. Here’s what it absolutely must include:
- Core SEO Details: Primary and secondary keywords, a target word count based on SERP analysis, and a draft title tag and meta description for the writer to build on.
- Audience & Goal: Who are we talking to? What’s their expertise level? What are they actually trying to do (search intent)? And what do we want them to do after reading?
- Content Outline & Key Points: A proposed structure with H2s and H3s, non-negotiable talking points or data to include, and a list of existing articles for internal linking.
- Webflow-Specific Instructions: Mention any specific Webflow components to use, like a pre-styled "Key Takeaway" component or a custom call-to-action block that the publisher will need to add later. This helps the writer structure the content accordingly from the start.
Weave SEO into the Writing Process
SEO can't be an afterthought where you just "sprinkle in" some keywords before hitting publish. That ship has sailed. Real optimization is baked into the article from the very first outline. By handing your writer a comprehensive, SEO-focused brief, you make optimization a natural part of the creative process, not a final, tedious chore. Honestly, this is where we see teams make the biggest leaps in efficiency.
This is also where AI is really changing the game. To get your content engine running faster, it's worth exploring some of the Best AI Content Creation Tools. These tools can help with everything from brainstorming topics and structuring outlines to polishing first drafts.
It's no surprise that 72% of organizations are planning to up their investment in AI, with teams reporting productivity bumps between 25% and 35%. But—and this is a big but—human oversight for quality control and strategic SEO is still absolutely critical.
Lock Down a Clear Review and Editing Cycle
The first draft is done. Now what? It enters the review phase, which can quickly become a bottleneck if you don't have clear rules of engagement. Nothing kills momentum and morale faster than endless, circular revision cycles.
To sidestep this, you need a structured feedback loop.
- Define the Reviewers: Keep the feedback circle tight. One or two key stakeholders, like an Editor and the Content Strategist, is ideal. Too many cooks absolutely spoil the content broth.
- Set Clear Timelines: Give reviewers a firm deadline, like 48 hours, to get their feedback in. This keeps the train moving.
- Insist on Actionable Feedback: Vague comments like "I don't like this" are useless. Feedback needs to be specific and constructive. Think: "Let's rephrase this sentence for clarity" or "Can we find a statistic to back up this claim?"
By putting a system around your creation, review, and editing stages, you transform a potentially messy process into a predictable, scalable engine. This structure empowers your team to consistently ship high-quality, optimized content for your Webflow site, minus the friction and delays that hamstring so many other teams.
Mastering the Webflow Publishing Process
Getting your content out of a Google Doc and into the Webflow CMS is so much more than a copy-and-paste job. Think of this as the final, crucial handoff in your production line—the moment a polished draft becomes a living, breathing asset. If you get this part wrong, all that hard work in writing and editing can go to waste, tanking your user experience and SEO before you even get off the ground.
This is your last chance for quality control. It's about more than just moving text over; it’s about strategically structuring content within the CMS, using Webflow’s features to your advantage, and running a meticulous pre-flight check to catch any last-minute gremlins. A solid publishing process ensures every article is not just well-written, but technically sound and ready to perform.
Structuring Content for the Webflow CMS
One of the best things about Webflow is its powerful, flexible CMS. But to really get the most out of it, you need to think beyond that single, massive Rich Text field. The goal is to build a better reading experience and a content system that’s easy to update down the line.
Here’s where to focus:
- Nail the Heading Hierarchy: This is absolutely non-negotiable. In the Webflow Rich Text editor, ensure your article title is the H1 (your template usually handles this), with your main sections as H2s and subsections as H3s. This simple structure is a game-changer for scannability and helps search engines grasp your content's structure.
- Get Creative with Custom Embeds: Instead of just pasting a raw YouTube link, use Webflow's custom embed element. Webflow Tutorial: Inside your Rich Text field, press
Enterto create a new line, click the+icon, and select theVideoorEmbedoption. This lets you drop in responsive video players or interactive charts, keeping the design clean. - Think in CMS Custom Fields: Don't just rely on the main "post body." Build out your CMS collection with custom fields for things like a "Key Takeaway" blockquote, an estimated "Reading Time," or a short "Featured Snippet Answer." This makes your content far more dynamic and ridiculously easy to manage at scale.
The Ultimate Webflow Pre-Publish QA Checklist
Before anyone on your team even thinks about hitting that publish button, they need to run through a standardized quality assurance checklist. This isn't just about catching typos; it's a full-blown technical and user experience audit.
A great QA checklist turns the chaotic final step into a predictable, repeatable process. It’s how you guarantee a high standard for every single post, every single time.
This systematic review catches all those common mistakes—broken links, missing alt text, wonky mobile layouts—that can quietly sabotage an article's performance.
I've put together a checklist that covers the essentials. Run through this before any post goes live.
The Ultimate Webflow Pre-Publish QA Checklist
Your final check to ensure every piece of content is technically perfect and optimized before it goes live in the Webflow CMS.
Check CategoryAction ItemStatus (Done/NA)SEO SettingsVerify Meta Title & Description are optimized and within character limits in the Page Settings panel.SEO SettingsConfirm the URL slug is clean, short, and includes the primary keyword.On-Page ContentCheck that all internal and external links open in a new tab and are not broken.On-Page ContentEnsure all images have descriptive alt text for accessibility and SEO.CMS ConfigurationConfirm Open Graph Title, Description, and Image are set for social sharing in Page Settings.CMS ConfigurationVerify the correct Author and Category are assigned to the post using your CMS Reference Fields.ResponsivenessUse Webflow's Preview mode to check layout on desktop, tablet, and mobile views.ResponsivenessTest functionality of any custom embeds or interactive elements on all devices.Final ReviewGive the article a final read-through directly in Preview mode to spot formatting errors.
Sticking to a checklist like this ensures nothing falls through the cracks. It's a simple habit that pays off big time.
Pro-Level Publishing Tips for Webflow
Once you've got the basics down cold, a few next-level tactics can really make your content stand out. These small adjustments can have a massive impact on an article's reach and longevity.
- Stop Reviewing in Google Docs: This is a big one. Use the "Share" button in Webflow's Preview mode to generate a live, shareable link of the draft. Send that link to stakeholders for final review. It lets them see the content exactly as it will appear on the site, which helps them spot formatting and design issues that are completely invisible in a text editor.
- Obsess Over Open Graph Settings: Don't just let Webflow (or social platforms) pull default info for social sharing. For every single post, go to the Page Settings for that CMS item and manually craft a compelling Open Graph (OG) title, description, and a custom-designed image. This is the difference between a post that gets ignored and one that gets clicked.
- Publish with a Purpose: Avoid hitting "publish" the second an article is ready. Dive into your Google Analytics data to find out when your audience is most active. Then, use Webflow’s built-in scheduling feature to push your content live during those peak traffic windows. Webflow Tutorial: In the CMS item settings, instead of hitting "Publish," click the arrow next to it and select "Schedule." Choose your date and time for maximum impact.
When you treat the publishing stage with the same respect as the writing and strategy stages, you give every single piece of content its best possible shot at success.
Driving Growth After You Hit Publish
It’s easy to think that hitting “publish” in Webflow is the finish line. But really, it’s just the starting gun. An amazing article that nobody reads isn't going to do your business any favors. The final, and arguably most important, part of your workflow is making sure all that hard work actually gets in front of the right people.
This is the point where you switch hats from content creator to content marketer. The focus immediately shifts to promotion and, crucially, measurement. It’s time to turn that new blog post into a real asset that drives growth.

A Sustainable Promotion Plan
Don't fall into the trap of thinking you need to be everywhere at once. The "spray and pray" method of content promotion is a quick recipe for burnout and mediocre results. Instead, pick a few high-impact channels and really own them.
- Your Email Newsletter: This is ground zero. Your subscribers are your warmest audience; they've literally asked to hear from you. Send a dedicated email for each new post, but don't just dump a link. Pull out the most valuable takeaway and explain why it matters to them.
- Targeted Social Sharing: Resist the urge to just drop a link and run. On a platform like LinkedIn, for example, you could pull out a surprising statistic, a punchy quote, or pose a thought-provoking question from the article. If you mentioned any people or companies, tag them! The goal is to spark a conversation, not just broadcast.
- Strategic Internal Linking: This is your secret SEO weapon. The moment a new article goes live, go back and find 3-5 of your older, high-performing posts and add a link to the new piece. This is a non-negotiable step. It passes authority and helps Google find and index your new content much faster. A smart internal linking strategy is one of the most powerful—and underrated—levers you have.
Measuring What Truly Matters
Promoting content without measuring its impact is just flying blind. To build a content machine that actually works, you have to track the key performance indicators (KPIs) that connect your articles to real business goals. This isn't about vanity metrics. It’s about figuring out what’s working so you can double down on it.
Your best friends for this job are Google Analytics (GA4) and Google Search Console (GSC). They’re free, incredibly powerful, and give you everything you need to start.
Tracking performance isn't just about proving ROI; it's about creating a powerful feedback loop. The data you gather should directly inform your future content strategy, helping you make smarter decisions about what to create next.
Set aside some time every month to check in on these core metrics for any new content you’ve published:
- Organic Traffic (GA4): How many people are finding your post from search engines? You want to see this trending up over the first 30-90 days.
- Keyword Rankings (GSC): Which search terms is your article actually showing up for? Are you making progress on your target keywords? This is how you know if your SEO efforts are paying off.
- Content-Driven Conversions (GA4): This is the metric that really moves the needle. Did someone read your post and then sign up for a demo or download a guide? Webflow Tip: You can track form submissions from your blog posts as conversion events in GA4. Set up a custom event that fires when a user is redirected to your form's "Thank You" page. This directly connects content views to lead generation.
By consistently keeping an eye on these numbers, you close the loop on your entire workflow. You’ll learn which topics your audience loves, which formats get the most engagement, and which keywords bring in high-value traffic. This is how you transform a blog from a simple marketing tactic into a predictable engine for growth.
Common Questions About Building a Webflow Content Workflow
Putting a detailed content plan into action is one thing, but making it work day-to-day is another. It's totally normal for practical questions to pop up as you start to build a more structured system. Let's walk through some of the most common hurdles I've seen Webflow teams face and how to get past them.
How Can a Small Team Implement This Without Getting Overwhelmed?
If you're a small team, the last thing you want is a clunky, corporate process. The key is to keep it simple and consolidate responsibilities. The goal is to build a lean foundation that you can scale up later, not drown in bureaucracy from day one.
A good starting point is to combine roles. Maybe one person handles the strategy, the writing, and the final publishing in Webflow. That's perfectly fine. The important part isn't creating a huge org chart, but making sure every critical step has a clear owner—even if that owner wears multiple hats.
Stick to a single project management tool like Notion or Trello to track everything from a raw idea to a published post. Keep your templates for content briefs and pre-publish checklists straightforward and to the point.
A simple, consistent workflow that your team actually follows is infinitely better than a complex one that gets ignored. Start small, nail the fundamentals, and only add layers when you genuinely feel the need.
What Are the Most Common Bottlenecks in a Content Workflow?
I see the same two speed bumps hit almost every team: the review and approval cycle, and the final handoff to get content published. Knowing where the friction is likely to happen is half the battle.
To get ahead of review delays, you need to set firm expectations. Give reviewers a clear deadline (like 48 hours) and insist on feedback that’s specific and actionable. A vague comment like "this needs work" is a showstopper. A helpful one is, "this section needs a data point to support the claim."
The publishing bottleneck is where Webflow really shines. You can solve this by creating pre-built content templates and reusable CMS components. For example, design a "Key Takeaway" component that you can drop into any blog post. This empowers whoever is publishing the content to format and launch new posts quickly, without needing a designer or developer for every single article.
How Often Should We Review Our Content Production Workflow?
Your workflow shouldn't be a static document gathering digital dust. Think of it as a living process that grows with your team, your tools, and your goals. A regular check-in cadence is crucial for keeping things running smoothly.
I recommend a light review every quarter. This is a perfect time for the team to flag small points of friction. Are the content briefs always missing key info? Are review cycles dragging on? Making small adjustments here can have a surprisingly big impact on your output.
Then, once a year, do a more thorough, deep-dive review. This is when you ask the bigger questions. Are our tools still the right ones for the job? Do our team roles need to be tweaked? And most importantly, does our content strategy still line up with what the business is trying to achieve?
How Do We Measure the ROI of a New Workflow?
Seeing the return on a better workflow comes down to tracking two things: how much more efficient you've become and how much better your content is performing. You really need to look at both to get the full picture.
On the efficiency side, start tracking what's often called "content velocity." This is simply the average time it takes to get from a validated idea to a live blog post. As your new process settles in, this number should steadily drop. You're producing the same quality (or better) in less time.
For performance, keep a close eye on your core content metrics.
- Organic traffic growth
- New keyword rankings
- Leads or conversions generated from your content
A truly effective workflow leads to a more consistent publishing schedule, which is exactly what fuels SEO and business growth. When you see those numbers go up, you can confidently point to the new process as a major reason why.
A powerful workflow is the engine behind predictable growth. At Block Studio, we build and manage these engines for ambitious Webflow teams, turning their websites into powerful sources of revenue. Learn how we combine design, development, SEO, and content to drive results.